Cleaning under dental bridges can be extremely tedious and take some time getting used to, which can be very discouraging and frankly annoying to do. A lot of patients that I see don’t clean under their bridge for that exact reason. We work together to go over ways that make it easier and prevent issues that can arise from not cleaning under it.
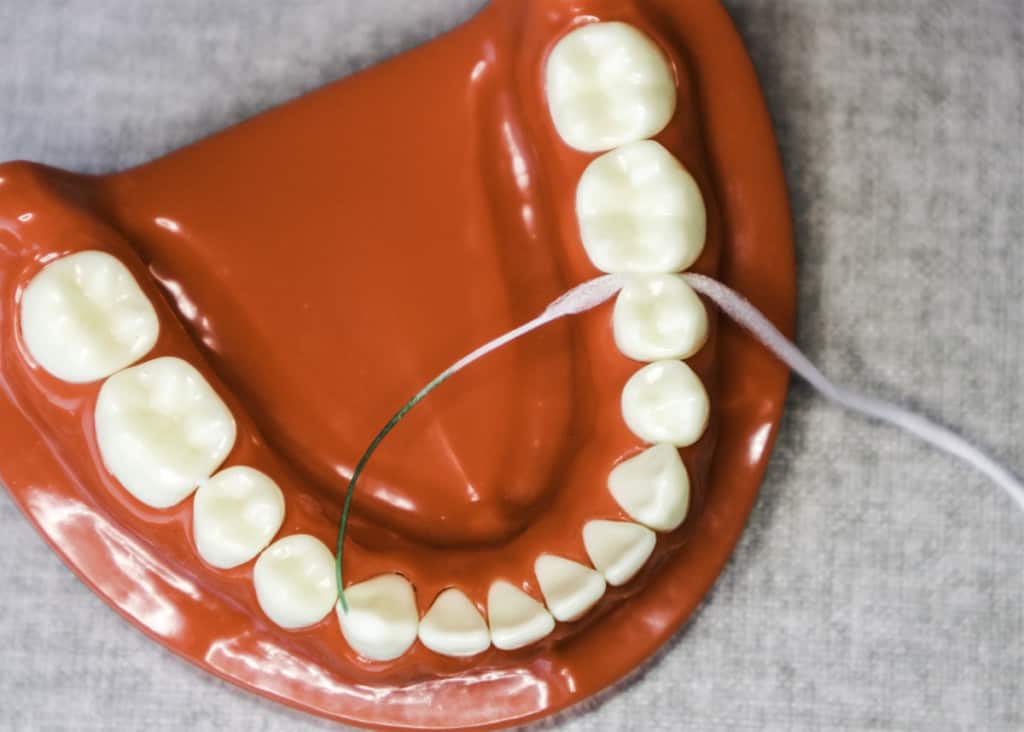
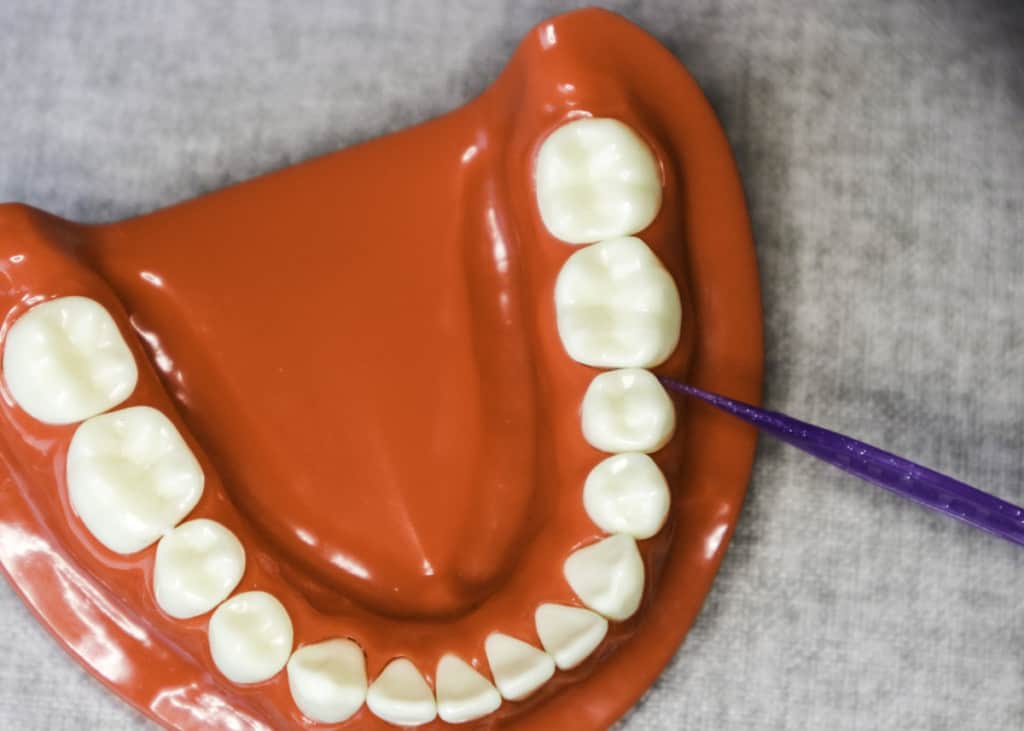
Use floss with a stiff end attached to spongy floss. Insert the stiff end under the bridge, wrap the spongy floss in a c-shape around the tooth and move up and down under the gumline. Then, move the floss gently back and forth under the fake tooth to reach the other end of the bridge to floss.
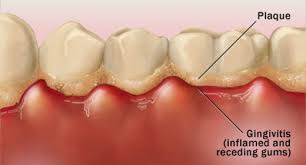
The purpose of cleaning under a dental bridge is to remove bacteria and food particles. If left there, the bacteria and food particles can contribute to decay, gum disease, infection, and bad breath.
In this post, I go over all the ways I show my patients how to clean under their bridge and how all the different tools can be used. For people with arthritis or other conditions that affect dexterity, it can change how they can clean under their bridge.
How to clean under a dental bridge
I think the hardest part of cleaning under a dental bridge is getting the floss underneath. It’s like threading a needle. It takes a precise angle and point of insertion. This can be made difficult for those with dexterity issues and even sight difficulties.
And sometimes the health of the tissues around the bridge can make it difficult to clean. If someone has inflammation in the gum tissue around and under the bridge, the gums may puff up so much that they start impinging on the bridge itself, not allowing floss or cleaning items to get underneath.
In this section, I go over how to floss under a bridge. But I also added in a few other things that I show my patients to use in conjunction with flossing or if they can’t floss.
Flossing under the dental bridge
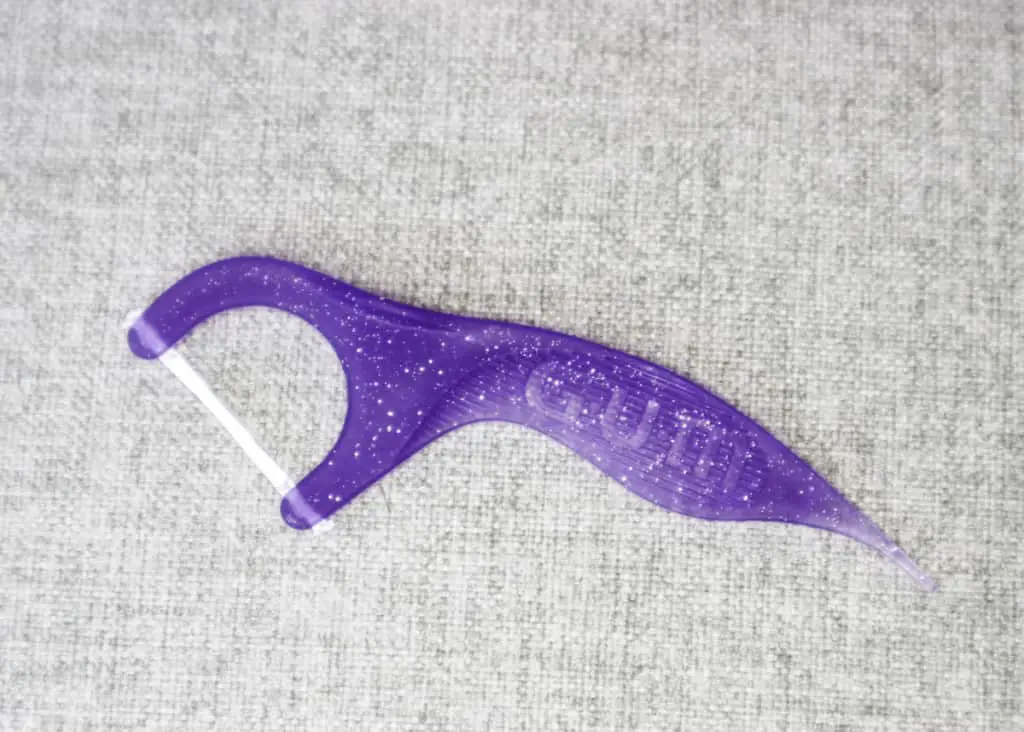
What you need: Superfloss, GUM Easy Thread Floss or a Floss threader and floss
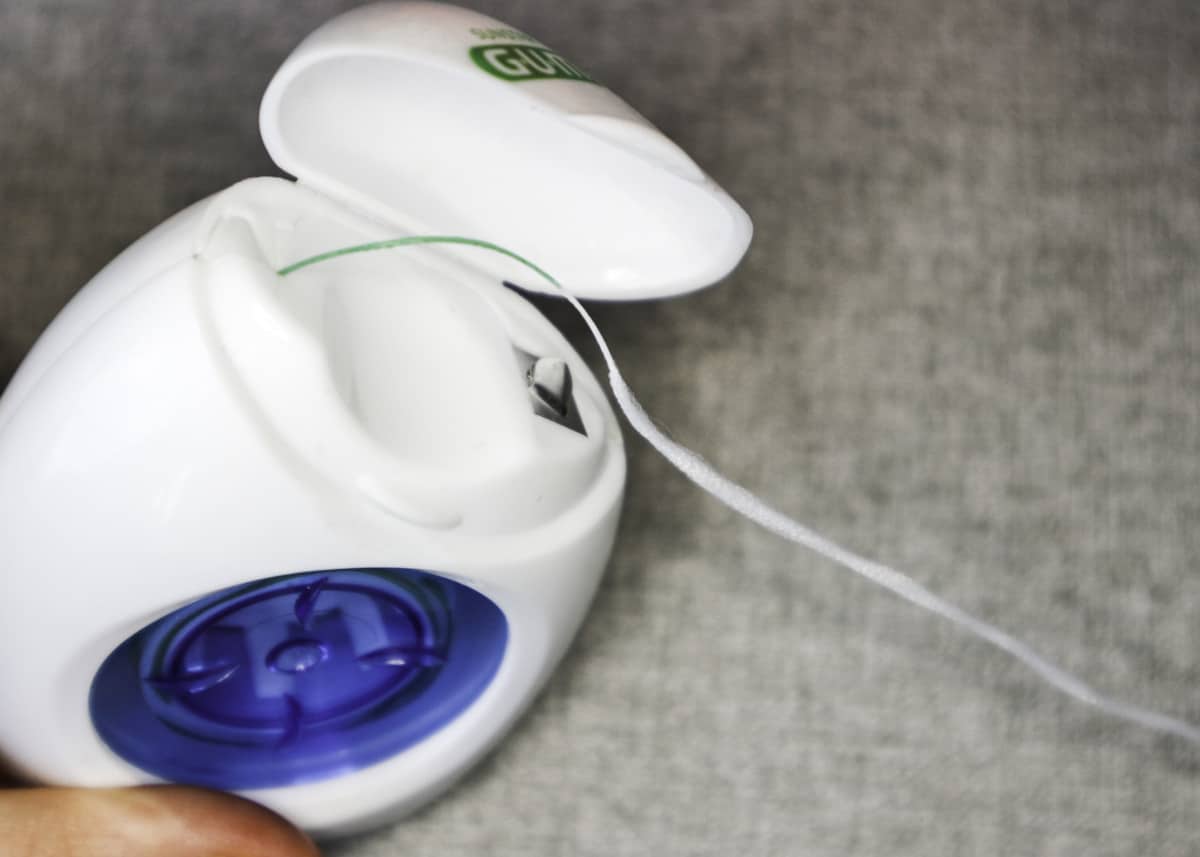
Superfloss and GUM Easy Thread Floss is pretty much the same thing with one end of the floss being hard attached to a section of spongy floss so it doesn’t matter which one you use.
A floss threader is a single piece of plastic that has a loop at one end. It looks similar to a sewing needle. Using this method will require you to “thread the needle” as the floss threader and floss are not attached.
I prefer my patients using Superfloss or GUM Easy Thread Floss because it has spongy floss. Spongy floss is much thicker and has more of a rough surface with air spaces which helps remove and trap more bacteria and food particles. This provides a much better clean than if they were to use regular floss on a floss threader.

How to use;
- To insert the floss under the bridge, you will want to insert it right beside the natural tooth under the bridge. (Don’t worry if it takes you some time to get used to)
- Once the floss is through, you will want to have enough floss on either side to grab with your fingers.
- Wrap the available floss that is on either side of the tooth around your middle fingers. By doing so, it leaves your thumb and pointer finger free to grab and manipulate the floss.
- When you have the proper grip around the floss, wrap the floss in a c-shape around the tooth. This will clean more surface area as the floss goes farther underneath the gum.
- Gently move the floss up and down along the tooth and guide it underneath the gumline.
- After you are done with one end of the bridge you will want to slowly move to the other side. But as you are moving the floss underneath the bridge, gently move it side to side under the fake tooth. This will clear the bacteria and food particles off the underside of the bridge, and also the gum tissue.
- Repeat the c-shape flossing technique on the other end of the bridge.
Sulcabrush
What you need: One Sulcabrush
A sulcabrush is a double-ended brush, with each end specifically designed for the outside surfaces and the inside (tongue side) surfaces. I love this tool, and I often give them out to my patients to use.
The bristles are longer and come to a point, which allows the bristles to get under the gumline to remove bacteria and food particles. The design is both ergonomic and functional.
How to use;
- When using this brush, make sure you are using the right end. The makers of this brush have so kindly marked which end is used on what surface.
- Angle the tip of the brush towards the gumline at a 45-degree angle. Gently touch the brush to the gumline. Use a sweeping motion to go back and forth horizontally along the gumline and do little circular motions between the teeth.
- Not only can you use this around your bridge, but you can also use it everywhere in your mouth.
You don’t need to use toothpaste with the Sulcabrush as long as you are following up with a regular brushing session with toothpaste after. It’s good to follow up with brushing with toothpaste after so the fluoride can remineralize the tooth surface. The fluoride will prevent decay and tooth sensitivity.
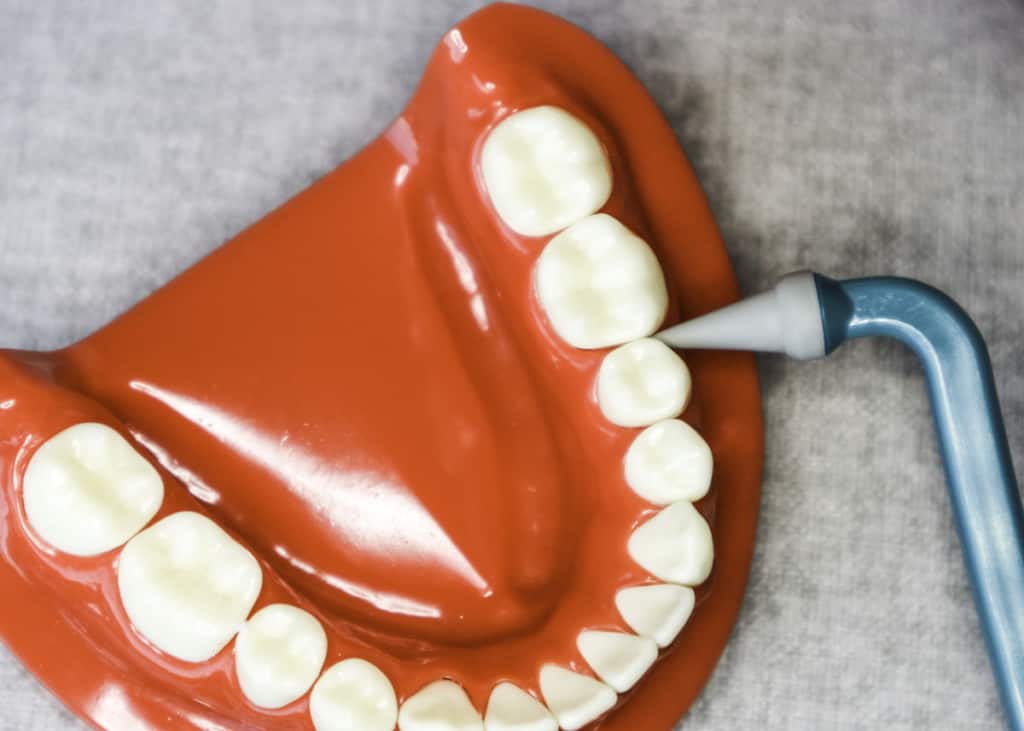
Oral irrigators
What you need: Waterpik and the Pik Pocket tip and Plaque Seeker tip
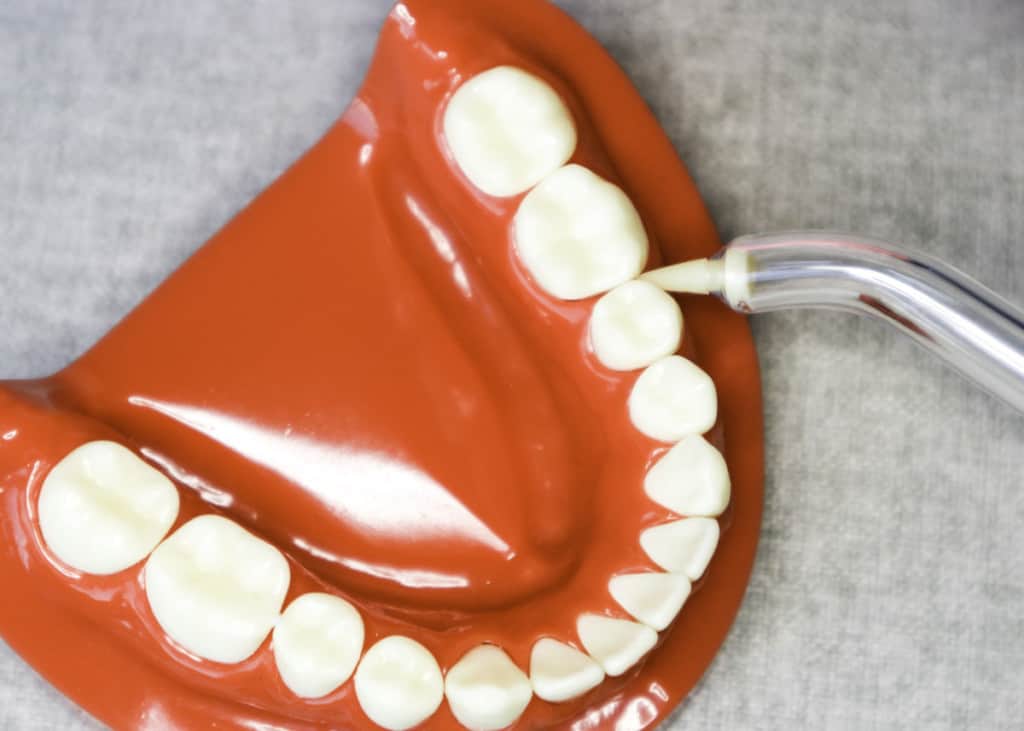
I love Waterpiks. I think they are one of the most underrated dental tools out there. Even though they do not replace the act of flossing, the amount of benefit they provide when used in conjunction with flossing is amazing.
After flossing, use the Waterpik to flush out the remaining bacteria and food particles that may have been missed. If you are looking at buying a Waterpik, do not buy an off-brand one. They don’t have specified tips and are not made as well.
How to use;
- If using the Pik Pocket tip
- Place the rubber tip at a 45-degree angle down along the gumline.
- With the Pik Pocket tip, you want to be careful what level of pressure you use. Don’t want to go above 1/2 on the power scale.
- Spend at least 5 seconds in each area.
- You don’t need to continuously move this while you are using it, pause for a few seconds and move on to the next area.
- If using the Plaque Seeker tip
- Place the tip at a 45-degree angle and touch the bristles to the tooth on the gumline.
- Gently brush along the gumline and hold for a few seconds in between the teeth.
This Waterpik on Amazon comes with both of the above tips so you don’t have to go and buy the tips separately.
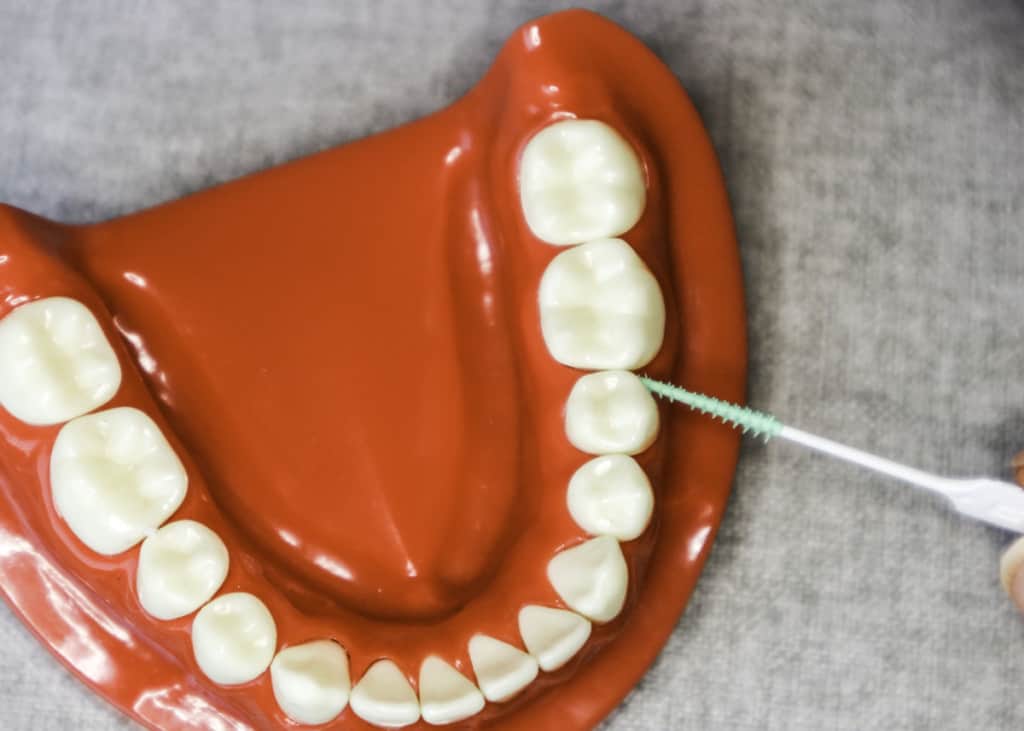
Interdental brushes
What you need: One interdental brush
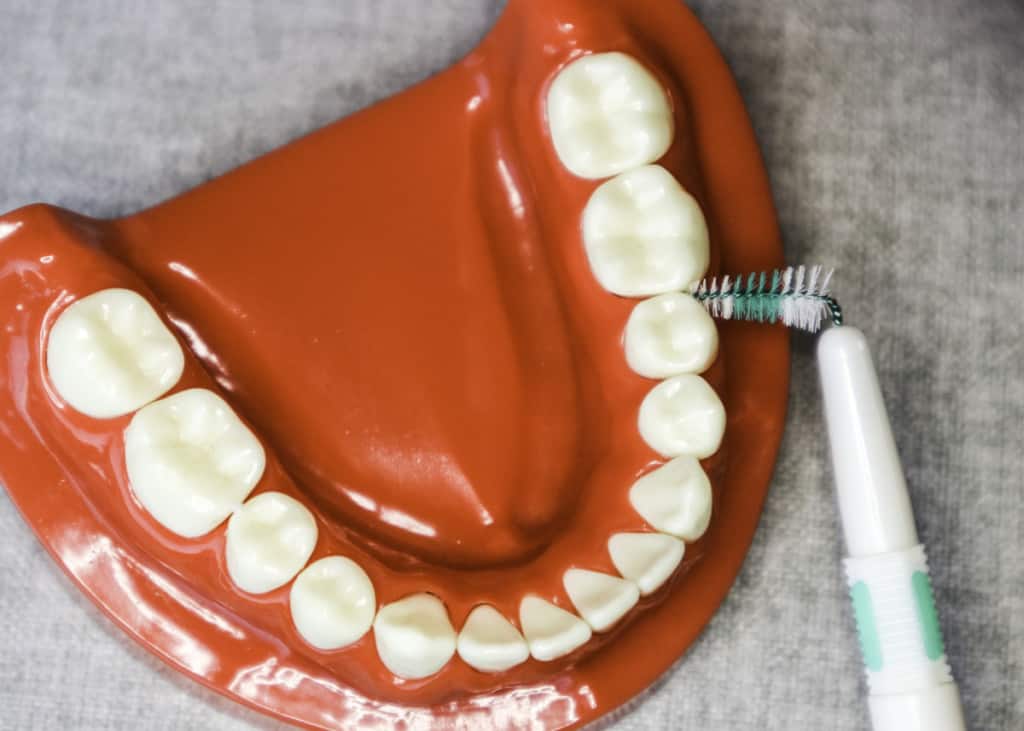
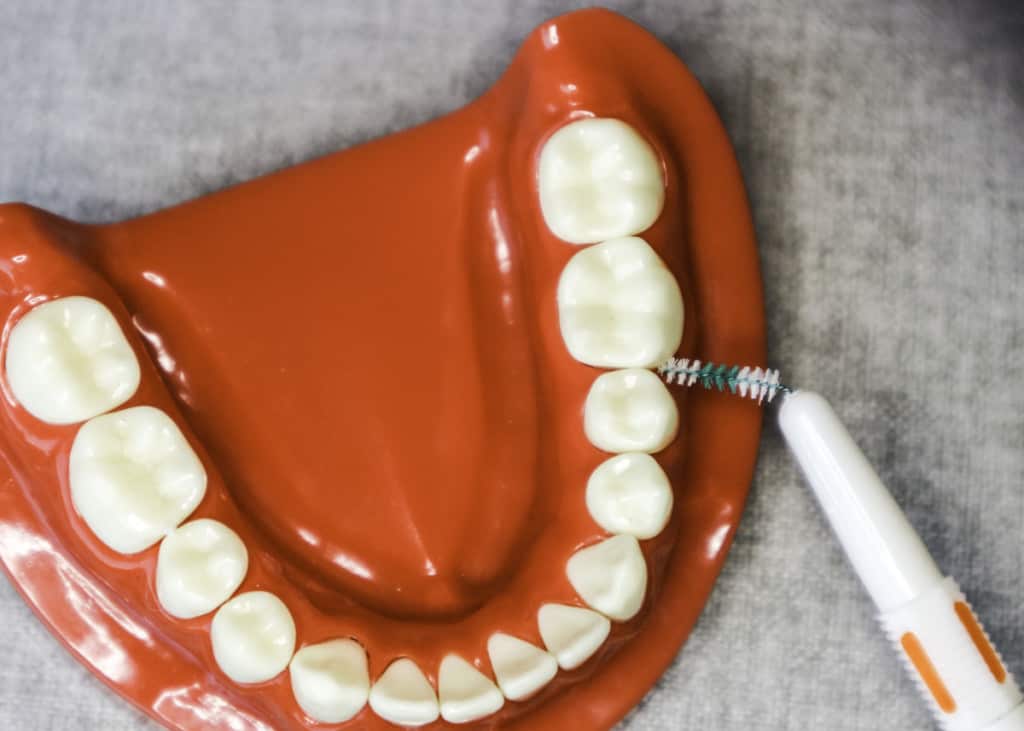
How to use;
- Gently insert the interdental brush underneath the bridge. It will be easier to do right beside the natural tooth under the bridge.
- Move the brush in and out between the teeth, and rinse it with water to remove the bacteria and food particles.
*IMPORTANT MESSAGE*
The brand name GUM has interdental brushes that use a coated metal wire that is safe for dental implants. You can find them here on my implant resource page
GUM Softpicks
What you need: One softpick
How to use;
- Gently insert the softpick between the teeth. And if it fits under the fake tooth that’s great! Use it everywhere it fits.
- The little rubber projections on the softpick help to remove the bacteria and food particles, and also stimulate blood flow in the gums. Stimulating blood flow in the gums helps to reduce inflammation if present.
Rubber tip stimulator
What you need: One rubber tip stimulator
How to use;
- You will want to guide the rubber tip along the gumline to help remove bacteria and food particles. But also, you can press the rubber tip into the gum tissues to blanch the tissue to promote blood flow and healing.
- Think of it as a massage for your gums!
Toothpick
What you need: One toothpick
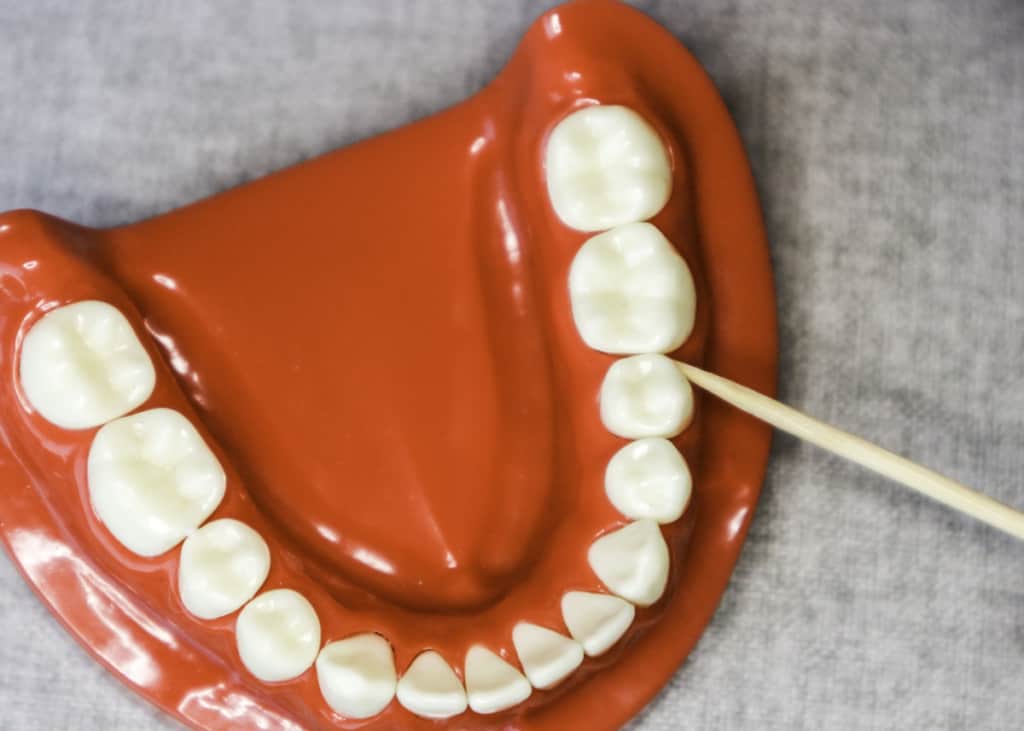
How to use;
- Be careful with this one, it can easily cut the gum tissue.
- With very gentle pressure, you can work the toothpick along the gumline and in between the teeth to remove bacteria and food particles.
- Discard after use.
Oral-B Power Tip Toothbrush head
What you need: One Oral-B Power Tip toothbrush head
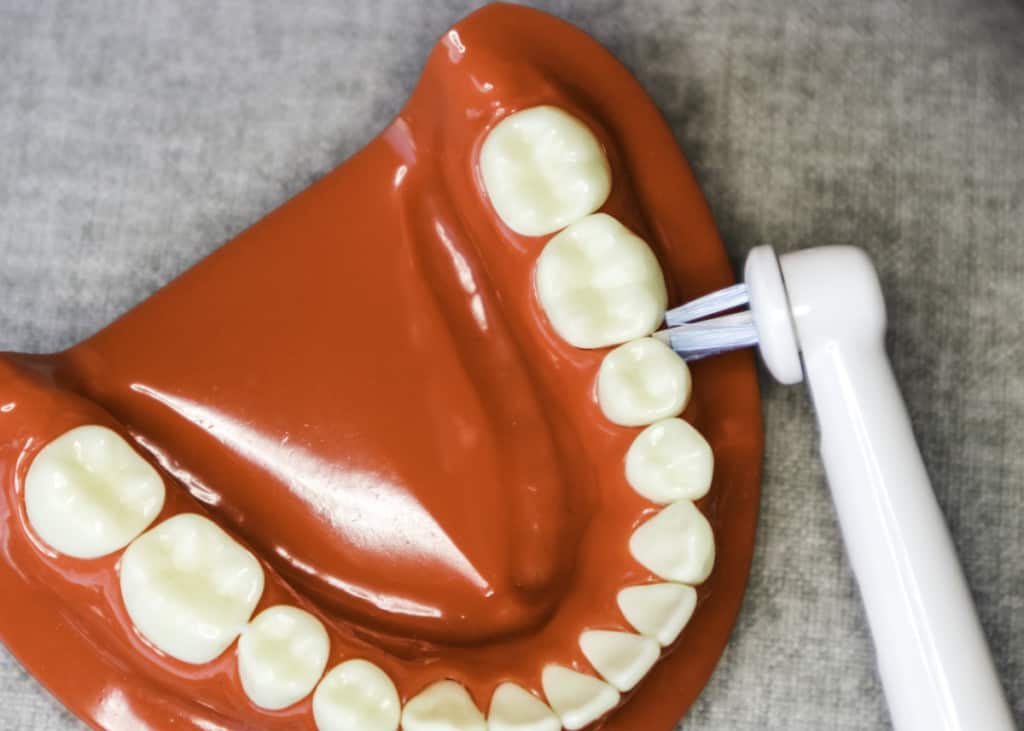
How to use;
- You will want to keep the head pretty steady while using it. Hold the toothbrush tip in-between the teeth and along the gumline.
- Try to maintain a 45-degree angle towards the gumline to allow the bristle to contour underneath the gums for a more effective clean.
- You can use this with toothpaste with fluoride to prevent decay under the bridge.
This is the Oral-B electric toothbrush I use and is available on Amazon. All Oral-B heads are interchangeable, another reason why Oral-B electric toothbrushes are the best on the market!
If you already have an Oral-B electric toothbrush here is the link to the Power Tip brush heads on Amazon.
In the article linked below, I go over the correct technique for brushing with an Oral-B toothbrush. If the wrong technique is used, it can cause irreversible damage to both the teeth and gums.
Read now: The Correct Way to Use an Oral-B Electric Toothbrush
GUM flosspick (or any floss pick with pointy end)
What you need: One GUM flosspick
How to use;
- You want to be gentle with this one too.
- Gently use the pointy end (not the floss end) to go along the gumline to remove bacteria and food particles. Try to get as far in between and underneath the bridge as possible.
Can you get a cavity under a dental bridge?
You can get a cavity underneath a bridge because there is a margin where the bridge material meets the root of the tooth that attracts cavity-causing bacteria.
I’ve had patients think because they have a bridge, it’s immune to cavities. It’s just not true.
Around each tooth is a “turtleneck” of gum tissue that isn’t directly adhered to the tooth. There is a space between the gum and the tooth where most of the bacteria live.
When the bacteria are not disrupted/moved, their numbers keep growing and growing. Bacteria produce acid that starts to breakdown the tooth, and the more bacteria, the more acid, resulting in a cavity forming.
The root surface of a tooth is more susceptible to cavities because it is much softer than the enamel and takes less time to break down.
What happens if you don’t clean under your dental bridge
If you don’t clean under your bridge you are more susceptible to;
- cavities
- gingivitis (a form of gum disease that just involves the gum tissue)
- periodontitis (a form of gum disease that affects both the gum tissue and the supporting structures of the teeth – bone and ligaments holding the teeth in the socket)
- all of the above can contribute to bone loss
These issues are serious, but they are preventable.
Types of dental bridges
There are 5 types of dental bridges. Traditional, Maryland, implant-supported, Cantilever, and composite.
Traditional bridge
A traditional bridge has a crown – fake tooth – crown in that order and they are all attached in one piece.
A traditional bridge can sometimes be called a 3-unit bridge.
Maryland bridge
A Maryland bridge is similar to a traditional bridge. But instead of having crowns on either side of a fake tooth, it has wings. Its sequence is; wing – fake tooth – wing all attached in one piece.
Implant-supported bridge
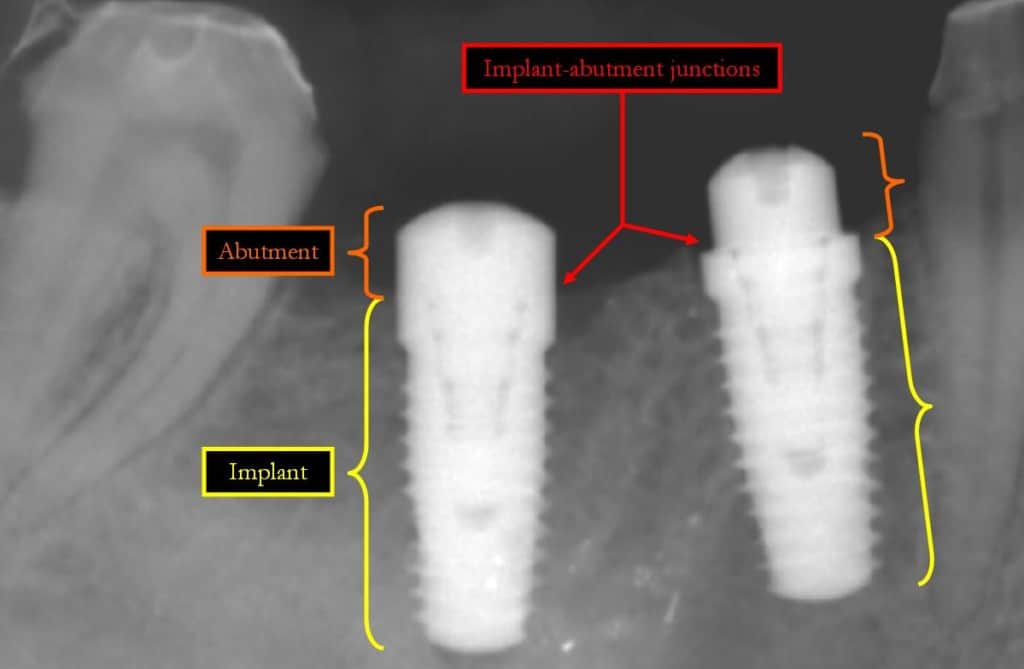
An implant-supported bridge is about the same as a traditional bridge. But the crowns on either end are implant crowns on top of implants. Its sequence is; implant crown – fake tooth – implant crown all attached in one piece.
Cantilever bridge
A Cantilever bridge is when the fake tooth only attaches to another crown on one side. So it doesn’t have support on both sides. The sequence of a cantilever bridge is; crown – fake tooth.
Sometimes a Cantilever bridge is called a 2-unit bridge.
Composite bridge
A composite bridge is made out of plastic filling material, and it is not as effective, and won’t last as long as other dental bridge types. Most bridge types are made out a much harder material, and often with porcelain fused to metal for them to be more durable and last longer.
Do implant supported bridges need to be cared for in the same way?
Real teeth are susceptible to gingivitis and gum disease, and so are dental implants.
When the tissue around the dental implant gets inflamed, its called peri-implant mucositis. When it involves the bone, it is called peri-implantitis.
Both of these conditions can cause tissue damage VERY quickly and need to be assessed by a dental professional because they can lead to the implants failing.
Remember! Only use plastic coated wire interdental brushes around implants! If the metal is not plastic coated, the metal could potentially scratch the implant abutment. Even though the scratch could be microscopic, so are bacteria! The bacteria will make that scratch their home. This could contribute to inflammation around the implant, and be a factor in the implant failing.
The best interdental brushes to use are are made by GUM.
Foods to avoid near your dental bridge
Any food and drink that is hard, sticky or sugary should be avoided. Some of these items include;
- popcorn
- hard nuts and seeds
- toffee
- ice (do not chew on it!)
- sugary drinks and food
The risks with consuming these types of things are it increases the risk of breaking, pulling off, and cavities.
Maintain regular cleanings and have dental X-rays
It’s important to have x-rays taken when you have a dental bridge because the dentist can spot a cavity that is just starting. If the cavity is small enough, they can intervene quickly and stop it from getting larger and causing further issues.
If the cavity gets too large, the dental bridge will have to be taken off, and a new bridge will have to be made.
And sometimes, if the cavity gets too deep and there is not enough tooth surface for a bridge to adhere to, you may not be able to get another bridge.
You might be able to have a surgery called crown-lengthening, where some bone is removed around the tooth. This surgery allows the new bridge to have more tooth structure to be adhered to.
Surgery can be an expensive fix but can be prevented with proper care and maintenance.
Click the link below to know how dental hygienists clean teeth and what happens in the dental office before, during, and after your appointment.
Read now: How Dental Hygienists Clean Your Teeth
How long do dental bridges last?
The average lifespan of a dental bridge is 10 years. But with proper care and maintenance, dental bridges can last up to 40 years. The biggest cause of dental bridge failure is tooth decay and fractures.
And to flip the coin, I have seen bridges only last for a year or two. This short lifespan of a bridge was mostly due to cavities underneath the crowns of the bridge and gum disease resulting in severe bone loss.
Holly 🙂
